Wednesday, October 18, 2017

Client Libraries in AEM

              Clientlibs or Client libraries in aem is one of the most widely used features provided by Adobe, it allows us to not only manage our client side resources like ( JavaScript, CSS, images, fonts etc ), but also provide options to debug, minify,merge and gzip the client-side code.

In this tutorial i will cover all the basic functionalities Client Library Folder provides and how we can use them in our components. After completing this tutorial you will have a clear understanding about:-

How to use Clientlibs in AEM:-

Using Client libraries in aem is very easy, we can create a client library folder either under apps, etc or libs but it is strongly recommended not to create client library folder under libs. This we will see later how we can restrict client library folder creation in aem.
  • Go to Crxde.
  • Select apps/project/<component>
  • Right Click and create new node.
    • Name: clientlib (You can use any name)
    • Type: cq:ClientLibraryFolder
  • Add categories property to clientlib node(Only mandatory property).
    • Name: categories
    • Type: String[]
    • Value: apps.aem.traning (This name will be used to identify respective clientlibs folder)
  • Create a css and js folder parallel to clientlib folder, where our css and js files will be placed.
  • Create a js.txt and css.txt file parallel to cilenlibs folder.
create clientlibs aem
Lets not go deeper into it as there are many tutorials available on how to create clientlibs but what we are interested in. Is the importance and role of creating such structure.

Client Library folder structure and its importance:-

Now if we look closely each node is used for specific purpose.
  • jcr:primaryType – The “clientlib” node must be of type cq:ClientLibraryFolder, so that aem understand that this is client lib folder.
  • categories – It is used to categorize or identify respective client library folder from where js and css files needs to be included. Value of this field is a String array i.e you could use an existing name here, which means that when we include client library in component jsp file using a category name that is available in more than one client library folder, then js and css files of all such folder will be send in the response.
    • If you want to include files from a particular clientlib folder then keep the category name unique.
      Note:- categories value is not a unique identifier. It can be assigned to multiple client lib folders.
    • It is advisable to preface the category value by ‘apps’ or ‘etc’ to specify location of clientlibs.
  • dependencies – when your client library files are dependent on some other files, you can use dependencies.
  • embed – You may face a situation where at run time you want to embed code from a client library(Js & css) into another client library. Then you should use “embed” instead of “dependencies”. But it might have size/speed issues if used frequently.

Things to notice about Child nodes js.txt and css.txt:-

  • A java script or css file will be generated by this name when we debug clientlibs, whereas minified file will be created by clientlib folder name.
  • Place each file name inside js or css.txt on separate line.
  • The first line should start with #base =[root], this refers to the path of folder that contains source file relative to TXT file.
    • For example if files are in same folder then write #base =.
    • But usually we put TXT file parallel to client library folder. For example #base = js_mobile , where js_mobile contains js files.
  • You can skip either of the js.txt or css.txt file, if your clientlib only contains resources of one type only.
Note:- If we don’t add TXT files to client library folder then aem wont treat it as client library folder, because inside client library folder it looks for txt file to understand what are files it need to include in our component jsp.

How to Minify, Gzip, debug and restrict Client Libraries creation under libs:-

To optimize aem performance, it is recommended to minify and gzip client libraries. Follow below steps to  minify, gzip, debug and restrict client library folder creation in aem:-
  • Login to Felix console and navigate to config manager.
  • Search for “Adobe Granite HTML Library Manager” (previously known as “Day CQ HTML Library Manager“).
  • Click on Adobe Granite HTML Library Manager below pop up will show up.
html library manager configurartion aem
  • Apart from minify and debug , you can also configure what should be the max age for cookies, you can also view the time taken by each file to load by enabling timing.

NOTE:-

While working with client libraries in aem below are some points to notice, which can save your efforts and improve productivity.
  •  Where are the generated client library files stored/cached in CQ?
    • You can view all generated clientlibs under /var/clientlibs
  • Is there a console where I can see all client libraries and their dependencies?
    • Yes, http://server/libs/cq/ui/content/dumplibs.html
  • How i can debug client library files in browser?
    • Use ?debugClientLibs=true to load all js and css files separately without concatanation.
    • ?debugClientLibs=true and CTRL+SHIFT+U gives you timing info
  • Is there a console available to invalidate and rebuild the ClientLibs?
    • Yes, http://localhost:4502/libs/granite/ui/content/dumplibs.rebuild.html

OSGI Services

What is a service?

An OSGi service is a java object instance, registeredinto an OSGi framework with a set of properties. Any java object can be registered as a service, but typically it implements a well-known interface.
The OSGi R3 specification, chapter 4.10 is highly recommended reading. Also, the javadoc for BundleContext contains lot of information.
The client of a service is always an OSGi bundle, i.e. a piece of java code possible to start via the BundleActivator interface.
Each bundle may register zero or more services. Each bundle may also use zero or more services. There exists no limit on the number of services, more than the ones given by memory limits or java security permissions.
Both publishing/registering and usage of services can be restricted by using java security permissions.
Registering a very simple object as a service
Long i = new Long(20); Hashtable props = new Hashtable(); props.put("description", "This an long value"); bc.registerService(Long.class.getName(), i, props);
Note: a service can also be registered as several interfaces. In this case, the object must implement all of the interfaces.

What is a service factory?

An OSGi service factory is a special class ServiceFactory, which can create individual instances of service objects for different bundles.
Sometimes a service needs to be differently configured depending on which bundle uses the service. For example, the log service needs to be able to print the logging bundle's id, otherwise the log would be hard to read.
A service factory is registered in exactly the same way as a normal service, using registerService, the only difference is an indirection step before the actual service object is handed out.
The client using the service need not, and should not, care if a service is generated by a factory or by a plain object.
A simple service factory example
class LongFactory implements ServiceFactory { public Object getService(Bundle bundle, ServiceRegistration reg) { // each bundle gets a Long with it's own id return new Long(bundle.getBundleId()); } void ungetService(Bundle bundle, ServiceRegistration reg, Object service) { // nothing needed in this case } } ServiceFactory factory = new LongFactory(); bc.registerService(Long.class.getName(), factory, new Hashtable());
Note: The framework will cache generated service objects. Thus, at most one service can be generated per client bundle.

What can services be used for?

The service concept is a very general-purpose tool, but some examples are:
  • Export functionality from a bundle to other bundles
  • Import functionality from other bundles
  • Register listeners for events from other bundles
  • Expose external devices, such as UPnP devices or even hardware, to other OSGi bundles. See the Device and UPnP APIs
  • Expose java code running in OSGI to an external network, e.g. via the UPnP or SOAP protocols.
  • Bundle configuration, using the Configuration Manager

Generally, services is the preferred method bundles should use to communicate between each other.

Sling Servlets


In Sling, Servlets can be registered as OSGi services like below:

   1. The @SlingServlet annotation

While defining a path , you must be specific what all paths are allowed to be used in the ServletResource OSGi service. If you define something randomly, your servlet might not be fucntional. Only a limited paths are allowed and the rest are blocked unless you open them up. This is resolved using resourceType.
You may have also configure the dispatcher , if you use some random path for your servlet. This might be a potential security threat and a needless configuration.
You might also have to specify the paths to your consumers for your servlet and any change in that path could have a serious affect. This might not be the case when you use resourceType
@SlingServlet(
resourceTypes = "sling/servlet/default",
selectors = "hello",
extensions = "html",
methods = "GET")
public class MyServlet extends SlingSafeMethodsServlet {
//TO DO
}


2. The @Properties and @Property annotations

@Component(metatype = true)
@Service(Servlet.class)
@Properties({
@Property(name = "sling.servlet.resourceTypes", value = "sling/servlet/default"),
@Property(name = "sling.servlet.selectors", value = "hello"),
@Property(name = "sling.servlet.extensions", value = "html"),
@Property(name = "sling.servlet.methods", value = "GET")
})
public class MyServlet extends SlingSafeMethodsServlet {
@Override
protected void doGet(SlingHttpServletRequest request, SlingHttpServletResponse response)
throws ServletException, IOException {
//TO DO
}
}


3. Registering the servlet by path

@SlingServlet(
paths={"/bin/customservlet/hashim"}
)
@Properties({
@Property(name="service.pid", value="com.day.servlets.SampleServlet",propertyPrivate=false),
@Property(name="service.description",value="SampleDescription", propertyPrivate=false),
@Property(name="service.vendor",value="SampleVendor", propertyPrivate=false)
})
public class SampleServlet extends SlingAllMethodsServlet
{
@Override
protected void doGet(SlingHttpServletRequest request, SlingHttpServletResponse response)
throws ServletException, IOException
{
//TO DO
}
@Override
protected void doPost(SlingHttpServletRequest request, SlingHttpServletResponse response)
throws ServletException, IOException
{
//TO DO
}
}


4. Register servlet by Resource Type

@SlingServlet(
resourceTypes = {"rep:User"},
methods = {"GET", "POST"}
)
@Properties({
@Property(name="service.pid", value="com.day.servlets.SampleServlet",propertyPrivate=false),
@Property(name="service.description",value="SampleDescription", propertyPrivate=false),
@Property(name="service.vendor",value="SampleVendor", propertyPrivate=false)
})
public class SampleServlet extends SlingAllMethodsServlet
{
@Override
protected void doGet(SlingHttpServletRequest request, SlingHttpServletResponse response)
throws ServletException, IOException
{
//TO DO
}
@Override
protected void doPost(SlingHttpServletRequest request, SlingHttpServletResponse response)
throws ServletException, IOException
{
//TO DO
}
}

Note:  If you want your @SlingServlet to fetch some properties from Felix Console Configurations using @Properties , add the parameter “metatype=true” in the form of declaration where @SlingServlet is used. 
This parameter is responsible for a Service component to be available in Felix Console configMgr. 
why resourceType is much more prefered for writing SlingServlets.

Workflow Basics And Process

What is Workflow
               A series of tasks to produce a desired outcome, usually involving multiple participants and several stages in an organization. Workflow describes the sequential steps that comprise a work process in the business environment. In its most comprehensive form, workflow includes the procedures, people and tools involved in each step of a business process. Workflow may either be sequential, with each step contingent upon completion of the previous one, or parallel, with multiple steps occurring simultaneously.

Sling Pipes

Sling Pipes
          Its a tool where you can load content tree nodes , perform some operation and either Retrieve an output or Modify the nodes. The aim here is to provide reusable blocks called pipes which can be configured for any possible operation on content.
screen-shot-2016-09-13-at-1-34-23-am
Install Sling Pipes in AEM
To begin with , you would AEM 6.1 + . Start with the download of the github project from here  and build it using

mvn clean install -DskipTests
     Once the build is successful, upload the jar file : org.apache.sling.pipes-0.0.9-SNAPSHOT.jar in /system/console/bundles. If the bundle doesnt get resolved download the org.apache.sling.query jar from  LINK1 and LINK2 and upload in AEM.
Make sure both the bundles are in Active state.
Basic Pipes
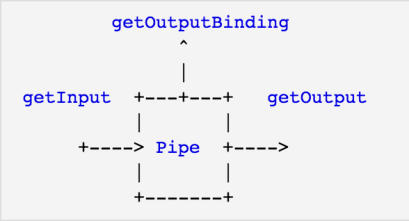
A Pipe is basically a jcr node which has several properties :
  • sling:resourceType= slingPipes/plumber
  • name= to be used as an id and could be a key for output bindings.
  • path= defines pipe’s input . If its not present previous pipes output will be used as input for this pipe.
  • expr= expression through which the pipe will execute
  • additionalBinding= It is a node you can add to set “global” bindings (property=value) in pipe execution
  • additionalScripts= scripts which can be used as expressions.
  • conf=optional child node to add additional configurations.
Reader Pipes : 
Pipe TypeDescriptionProperties
 Base PipeDummy pipe, output=inputsling:resourceType = slingPipes/base
Sling Query Pipeexecutes $(getInput()).children(expression)
  •  sling:resourceType = slingPipes/slingQuery
  • expr = mandatory property, contains slingQuery expression through which getInput()’s children will be computed to getOutput()
 JSON Pipefeeds bindings with remote json
  • sling:resourceType = slingPipes/json
  • expr mandatory property
 MultiPropertyPipe iterates through values of input multi value property and write them to bindings
  • sling:resourceType=slingPipes/multiProperty
  • path = path of a mv property
 XPath Pipe gets resources from the xpath query.
  • sling:resourceType= slingPipes/xpath
  • expr = xpath query expression
 Authorizable Pipe retrieve authorizable resource corresponding to the id passed in expression
  • sling:resourceType = slingPipes/authorizable
  • expr = authorizable id
  • autoCreateGroup (boolean)
  • addMembers (stringified json array)
  • addToGroup (expression)
  • bindMembers (boolean)
 Parent Pipe outputs the parent resource of input resource
  • sling:resourceType= slingPipes/parent
Filter Pipeoutputs the input resource if its matches its configuration
  • sling:resourceType = slingPipes/filter
  • conf node
  • slingPipesFilter_not=’true’ inverts the expected result of the filter

Containers:
Pipe TypeDescriptionProperties
Container Pipeused to assemble a sequence of pipe.
  • sling:resourceType = slingPipes/container
  • conf node
Reference Pipeexecutes the pipe referenced in path property.
  • sling:resourceType = slingPipes/reference
  • path

Writers:
Pipe TypeDescriptionProperties
Write PipeWrites nodes and properties to the input of pipe
  • sling:resourceType = slingPipes/write
  • conf node
Move Pipe used to move input to target path.
  •  sling:resourceType=slingPipes/mv
  • expr=target path
Remove Pipe removed the input resource (node or prop) and returns the parent.
  •  sling:resourceType=slingPipes/rm
  • conf node
Path Pipe get or create path in an expression.
  •  sling:resourceType = slingPipes/path
  • nodeType = node type of the intermediate nodes to create
  • autosave = to save at each creation.
Execute Sling Pipe
            Once the configurations are ready , broadly there are 2 ways to execute a pipe. If its just a GET call / read operation you can directly call it from browser or use cURL command. If its a POST call / write operation, you have to use cURL. Besides these basics you can also pass few parameters to execute a pipe. We will see more with examples.
             Sling Pipes is apparently quite new in the AEM world , so it you might not get much context about it online. If you need to explore something complex using Sling Pipes, start with basics and then try to build upon the complex scenarios. You may also comment below few scenarios where content modification is needed and I can help you explore the usage of Sling Pipes in that use case. Going forward , I am sure this would be boon to us. Happy Exploring. !!
Read More Information about Sling Pipe below